How to Read a Tattoo Pain Chart First Tattoo Placement Guide
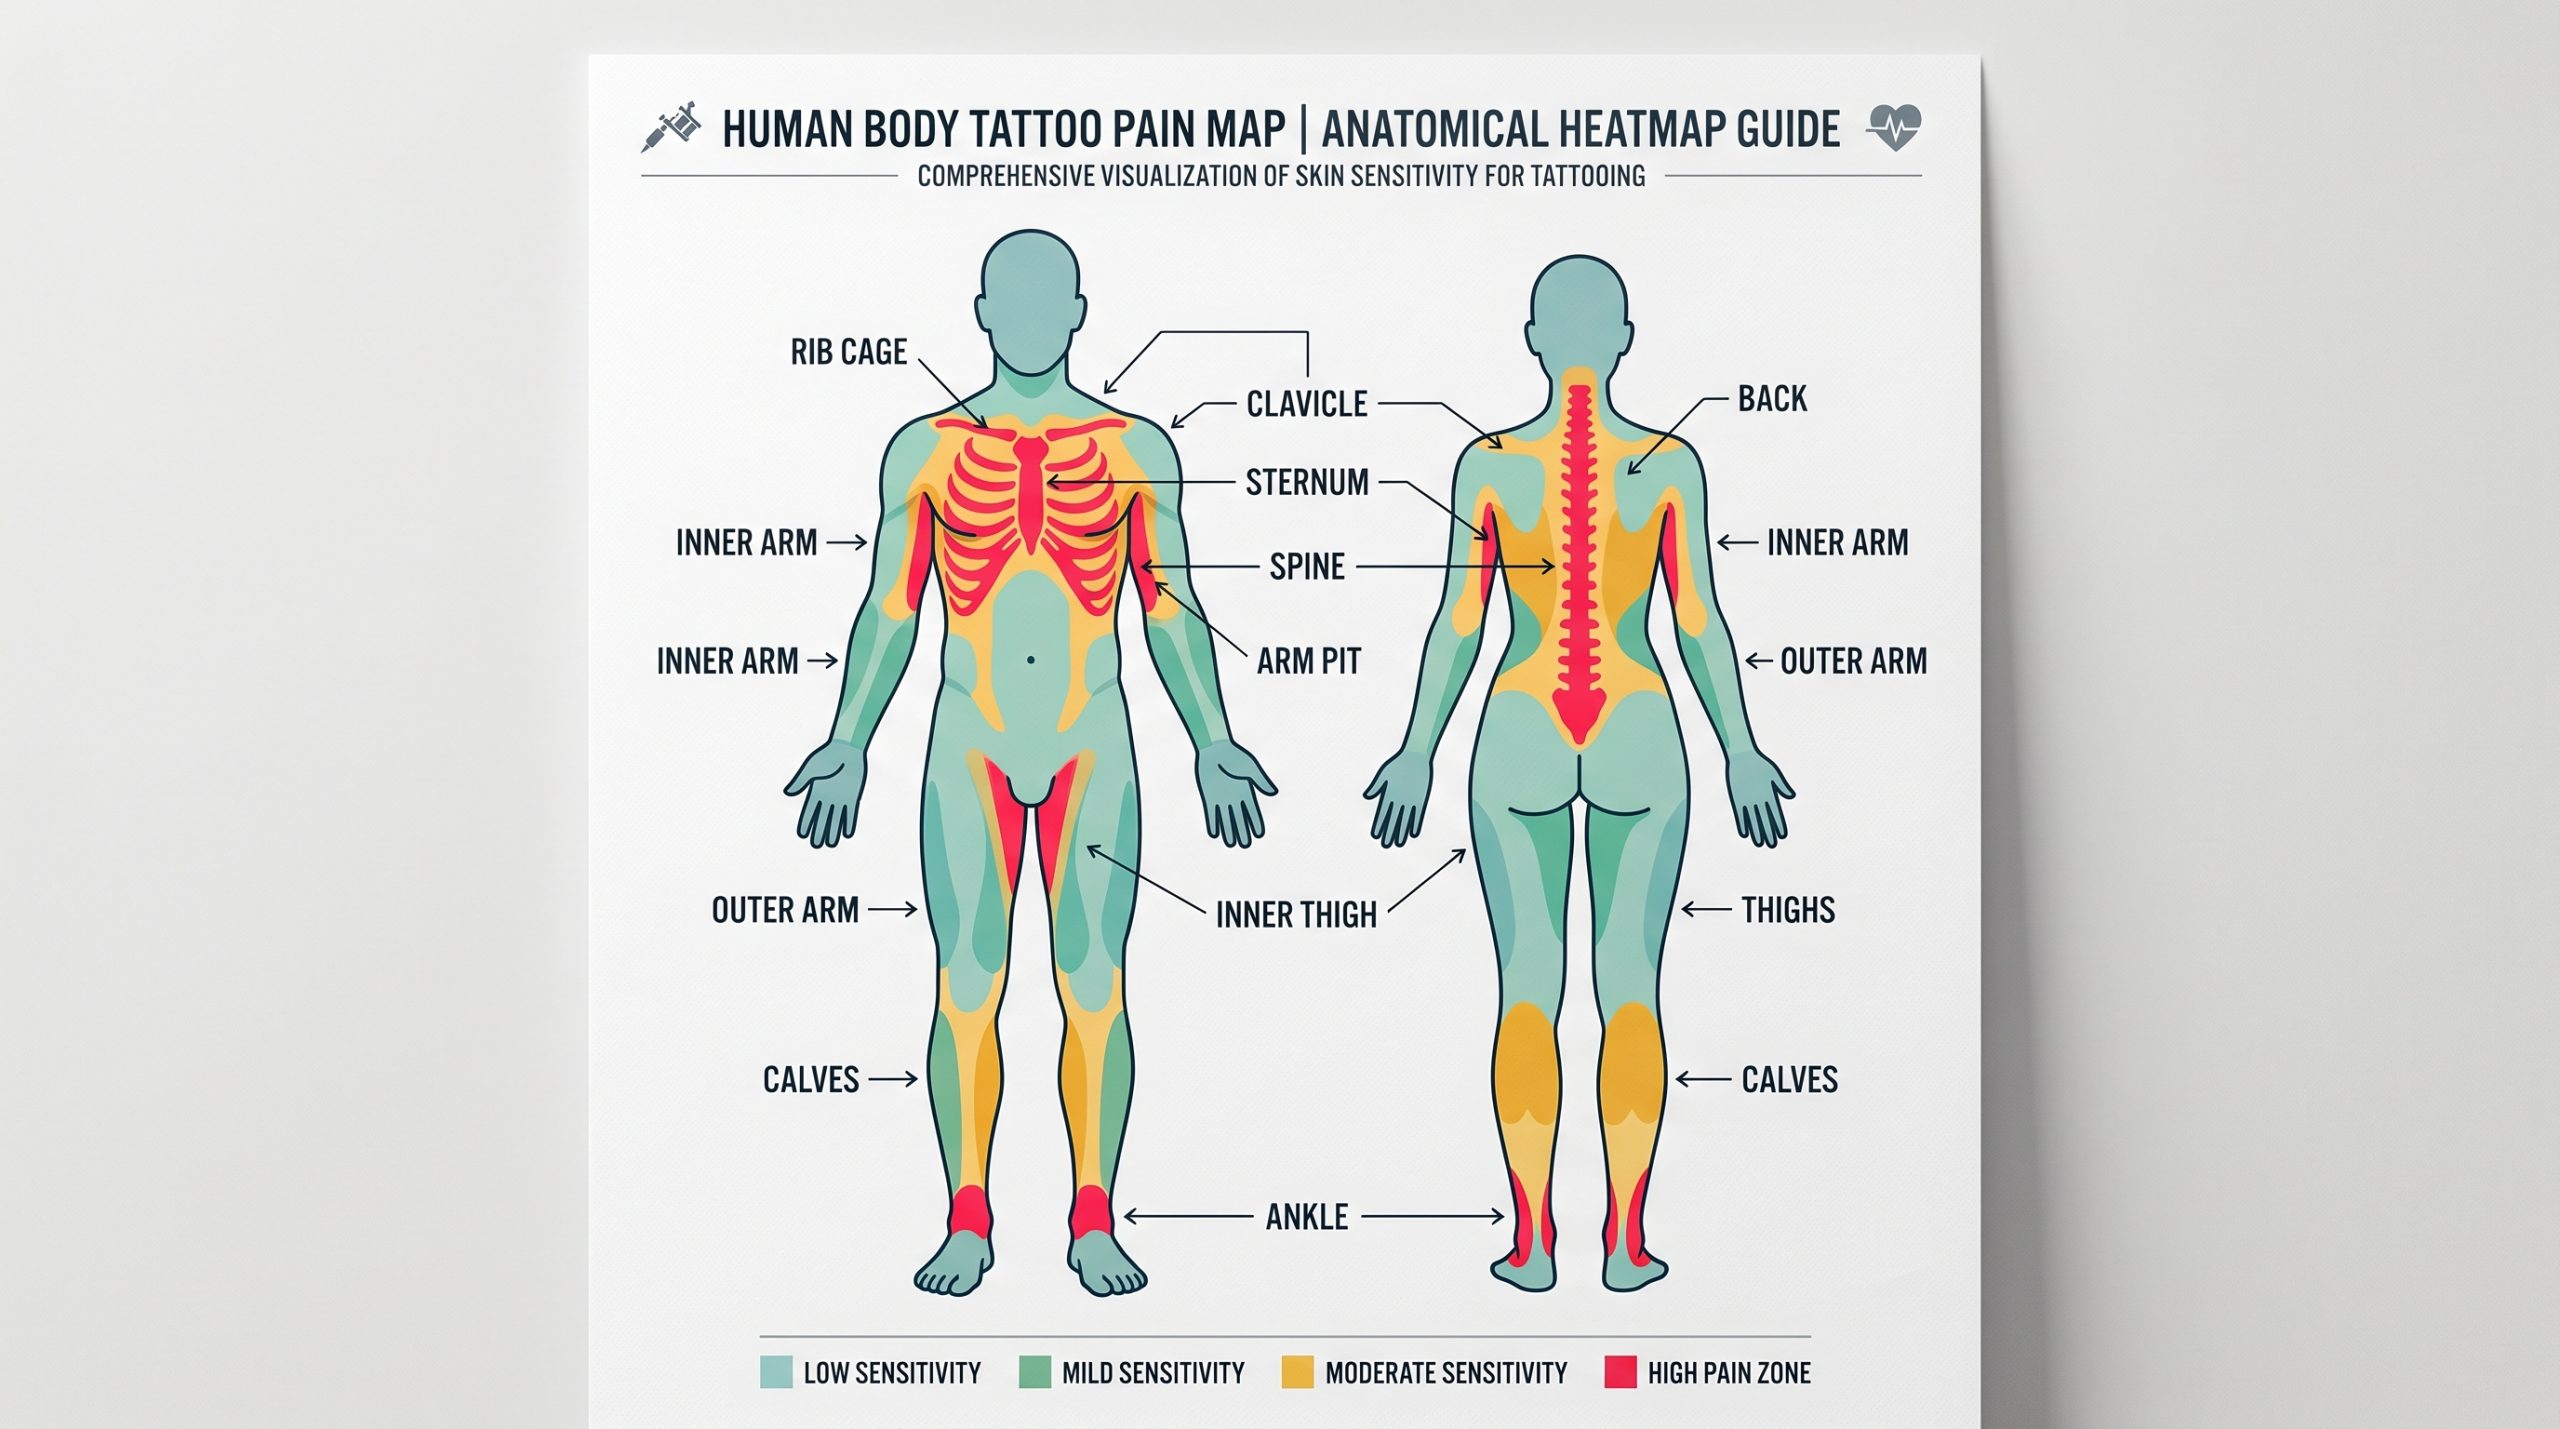
Getting your first ink and terrified of the needle? Consulting a comprehensive tattoo pain chart first tattoo guide helps you pick a placement that matches your personal pain tolerance.
The most common question first-time tattoo clients ask is simple: “How bad does it actually hurt?”
Pain is subjective, but human anatomy is remarkably predictable. Whether a tattoo feels like a minor scratch or an intense, breath-stealing vibration comes down to biological factors: nerve density, skin thickness, and proximity to bone.
If you are planning your first piece at a studio in Berlin, Hamburg, or Munich, choosing the right placement can mean the difference between a relaxed session and an agonizing ordeal.
Here is an anatomical breakdown of tattoo pain levels, ranked from least to most painful, plus realistic advice on what different needle techniques actually feel like.
1. The Tattoo Pain Hierarchy at a Glance
| Pain Level | Body Locations | Sensation Description | Beginner Suitability |
| Low (1–3 / 10) | Outer Upper Arm (Bicep/Deltoid), Outer Thigh, Forearm | Warm scratching, dull sunburn | Ideal for Beginners |
| Moderate (4–6 / 10) | Calves, Shoulders, Lower Back, Inner Forearm | Focused prickling, deeper vibration | Manageable |
| High (7–8 / 10) | Knees, Shins, Inner Bicep, Chest, Collarbone | Burning scratch against bone, radiating heat | Challenging |
| Extreme (9–10 / 10) | Ribs, Sternum, Armpit, Spine, Feet/Ankles, Groin | Piercing vibration, breath-holding sharp sting | Not Recommended First Time |
2. The Least Painful Spots (Best for Your First Tattoo)
If you are nervous about your pain threshold, these low-sensitivity placements let you get accustomed to the process without white-knuckling the armrest.
Outer Arm & Bicep (Pain Level: 1–2 / 10)
The outer arm is the classic beginner sweet spot. The skin is thick, nerve endings are relatively sparse, and a healthy layer of muscle cushions the needle’s vibration away from underlying bone. Most people describe it as a steady, mild scratch that fades into background noise after 15 minutes.
Forearm (Pain Level: 2–3 / 10)
The top and outer sections of the forearm are exceptionally easy to sit for. You have clear view of the process, which helps calm anticipatory anxiety.
- Note: Pain increases slightly as the needle approaches the crease of your inner elbow or gets within 2 cm of the wrist bones.
Outer Thigh (Pain Level: 3 / 10)
The front and outer quadriceps offer ample tissue and low nerve density. It is an optimal canvas for medium-to-large flash or custom pieces, though long sessions can cause muscle twitching due to involuntary fatigue.
3. Moderate Pain Spots (Manageable with Preparation)
These areas are entirely doable for a beginner, provided you are well-rested, fed, and prepared for intermittent sharp moments.
Calf & Upper Back (Pain Level: 4–5 / 10)
The calf muscle absorbs needle impact well. However, getting close to the back of the knee (Kniekehle) or the Achilles tendon spikes sensitivity quickly. The upper back (away from the spine) feels like an intense, warm sunburn during line work.
Inner Bicep (Pain Level: 5–6 / 10)
While cushioned by muscle, the skin on the inner bicep is thin and sensitive. The sensation alternates between manageable scratching and a sharp pinching feeling, especially near the armpit fold.
4. The “Red Zones”: Most Painful Placements
Unless you are completely confident in your pain tolerance, avoid these placements for your very first piece.
1. The Ribs & Sternum (Pain Level: 9–10 / 10)
The ribs have minimal subcutaneous fat, thin skin, and an intricate network of intercostal nerves. Every strike of the tattoo machine vibrates directly into your skeletal system, making steady breathing difficult. It feels like a hot blade scraping repeatedly over bone.
2. The Spine & Back of Neck (Pain Level: 8–9 / 10)
Because the spinal column houses the central nervous system, needle vibrations resonate along the entire back, occasionally triggering involuntary twitching or phantom nerve sensations elsewhere on the body.
3. Ankles, Tops of Feet & Shins (Pain Level: 8–9 / 10)
Skin stretched tightly over bone with zero muscle cushion leads to intense, vibrating discomfort. Foot tattoos also swell considerably during the first 48 hours of recovery.
4. The Armpit & Knee Ditch (Pain Level: 10 / 10)
These flex zones contain major lymph nodes and clustered nerve clusters. Tattooing the ditch behind the knee or the armpit is widely regarded by tattoo veterans as excruciating.
5. What Does Tattoo Pain Actually Feel Like?
Tattoo discomfort changes depending on the needle grouping and task:
- Fine-Line Work: Feels like a precise, hot needle or a focused cat scratch dragged slowly across the skin.
- Heavy Outlining: A deeper, vibrating drag that creates an acute burning sensation.
- Shading & Color Packing: Uses multi-needle magnum groupings. It feels less like a pinpoint stab and more like rough sandpaper rubbed vigorously against a fresh sunburn.
- The “2-Hour Wall”: Your body releases natural endorphins and adrenaline during the first 90 to 120 minutes to mute pain. Once those neurochemicals deplete, even gentle wiping with a paper towel feels raw and sharp.
6. How to Prepare Your Body to Minimize Pain
You cannot eliminate pain entirely without altering skin chemistry, but you can control your biological reaction to it:
- Eat a Heavy Carbohydrate Meal 2 Hours Prior: Tattooing causes rapid blood sugar drops, which can trigger dizziness, shaking, and nausea. Eat oatmeal, pasta, or rice before arriving at the studio.
- Hydrate 24 Hours in Advance: Dehydrated skin is firmer, harder to needle, and absorbs ink less willingly, requiring the artist to make additional passes over the same patch.
- Avoid Blood Thinners: Do not consume alcohol, aspirin, or excessive espresso drinks on appointment day. Thin blood pools at the needle tip, washes out the stencil, and increases skin trauma.
- Use Controlled Breathing: When line work hits a sensitive spot, exhale slowly through your mouth. Holding your breath tenses your muscle fibers, amplifying the sting.
Frequently Asked Questions (FAQ)
Can I use numbing cream for my first tattoo in Germany?
Most professional artists in Germany discourage or outright forbid over-the-counter numbing creams (like Emla). Numbing agents alter skin elasticity, make ink saturation less predictable, and can cause intense “pain shock” when the chemical wears off mid-session. Always consult your artist before applying any topical anesthetic.
Does getting tattooed over stretch marks or scars hurt more?
Yes. Scar tissue and stretch marks lack standard cellular architecture; they are either dense and fibrous or unusually thin, making them significantly more sensitive to needle depth than surrounding undisturbed skin.
Is it normal to shake or feel cold during a session?
Yes. This is a standard adrenaline reaction often referred to as “tattoo shock.” When your body experiences prolonged minor trauma, blood shunts toward your core. Bring a warm hoodie, sip a sugary drink, and let your artist know if you need a 5-minute break to stabilize.
About The Author
